The Comprehensive Guide to Proper Basement Waterproofing
Waterproofing a basement is a complex task that requires expertise, precision, and the right materials. In this blog, we’ll walk you through the key steps involved in a proper basement waterproofing job, highlighting why professional installation is crucial. We’ll use a real-life example of a project we recently completed in Bowling Green, Kentucky, where we had to correct previous mistakes to ensure the homeowner’s basement remained dry and safe.
The Importance of Professional Waterproofing
Many homeowners attempt DIY solutions or hire contractors who might not have the necessary expertise, leading to inadequate waterproofing. In our featured project, the previous attempt at waterproofing failed because it lacked an interior drainage system, relying instead on exterior solutions. Over time, changes in the environment, such as new driveways and additional structures, can redirect water toward your property, making external solutions insufficient.
Why Above-the-Footer Drains Are Ideal
In most of our projects, we use above-the-footer drains, which we find to be highly effective for waterproofing. These systems prevent water from pooling near the foundation, ensuring it is directed into the sump pump for discharge. This method is suitable for about 80% of the structures we work on, but we also have alternative methods for different scenarios.
Key Steps in Basement Waterproofing
- The first step is to clean the basement walls and floor. This provides a clear view of any cracks or leaks that need attention.
- In our project, we started by cleaning the wall where the previous system failed, preparing it for a new, more effective solution.
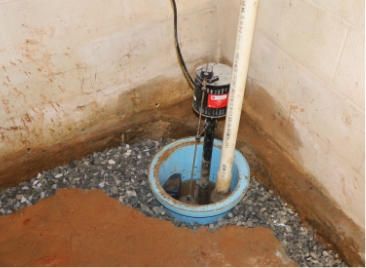
- Interior Drainage: We install an interior drainage system that captures water at the point of entry. This system directs water into a sump pump, which then discharges it away from the house.
- Dimple Mat and Liner: A dimple mat is placed against the wall, with a liner tucked behind it. Water enters, hits the liner, flows down into the gravel, and then into the drainage system. This method ensures water is managed efficiently and directed away from the foundation.
- Once the drainage system is in place, we restore the concrete floor. This involves smoothing out the new concrete to ensure a clean, finished look.
- Properly finishing the concrete also helps in maintaining the structural integrity of the basement floor.
- Kentucky is known for high radon levels, making radon mitigation a crucial part of our waterproofing process. We avoid systems that leave gaps or flanges, which can allow radon gas to enter the home.
- Our sump pump systems are nearly airtight, significantly reducing the risk of radon infiltration.
Real-Life Example: Fixing a Failed Waterproofing Job
In a recent Bowling Green project, the homeowner faced persistent water problems despite having multiple sump pumps and drains installed by previous service providers. These measures were insufficient because the water was not properly controlled. We installed a comprehensive system that managed the water effectively, guiding it to the sump pumps for discharge. The result? The homeowner no longer experiences water problems, even after heavy rains.
Trust the Professionals
Waterproofing your basement is not a DIY project. It requires professional expertise to ensure that your home remains dry and safe from water damage and radon gas. At Foundation Solutions Group, we pride ourselves on delivering high-quality, permanent solutions. If you have a basement water problem, contact us today for a free inspection. Let us show you the difference that professional installation can make.
Written By Shaun Miller, Owner Foundation Solutions Group
Shaun Miller is the owner of Foundation Solutions Group, a trusted foundation repair and waterproofing company serving South Central Kentucky and Middle Tennessee. With over 20 years of experience, Shaun is committed to delivering quality craftsmanship and ensuring that every project is done right the first time, backed by the company’s “Fix-It-Forever Guarantee.” Passionate about educating homeowners, Shaun leads the company’s "Solutions University" initiative to help clients protect their homes through knowledge and preventative care. Dedicated to his community, Shaun also supports local organizations and values the trust his customers place in him.